
使用 XNA 建立遊戲/3D 開發/地形建模

我們如何將基於 XNA 框架的地形實現並建模到我們的遊戲中?本維基條目將專門解決這個問題。例如,將展示如何使用高度圖建立地形。此外,我們將建立紋理,將其拖放到我們的地形上,並編寫大量原始碼。最後,將提供一些關於地形建模相關主題的技巧。
高度圖(維基百科:高度圖)只不過是灰度圖。也就是說,一個 2D 紋理,它指出我們地形的高度和深度。灰度圖的每個畫素都在 0 到 255 之間,表示我們的海拔高度。要建立這樣的地圖,請使用 Terragen 之類的程式。
Terragen 是一個用於快速建立逼真地形影像的程式。但是,它也是建立高度圖的完美工具。Terragen 有兩個版本(日期:2011 年 06 月 05 日),一個需要付費的版本 - Terragen 2 和一個免費版本 Terragen Classic。對於我們的需求,免費版本已經足夠了。
介紹就到這裡 - 讓我們開始吧。下載並安裝 Terragen Classic 後,我們可以看到以下選單

在左側,我們可以看到 Terragen 提供的按鈕。第一步是單擊“地形”,一個新視窗將開啟。在這裡,我們單擊“大小”來調整高度圖的大小 - 257x257 或 513x513。提示:如果您已經實現了天空盒,請使用天空盒影像的大小。接下來,我們單擊“檢視/雕刻”來建模我們的高度圖。您將看到一張帶有白色箭頭的黑色圖片 - 這是您的相機視角。您可以透過將箭頭移動到所需位置來根據需要調整視角。要開始繪製地形,您需要單擊位於視窗左上角的“基本雕刻工具”(1)。現在您可以開始繪製地形了。結果應該類似於此

如果您對結果不滿意,您始終可以單擊地形視窗中的“修改”並調整某些設定,例如山脈的最大高度。另一個有用的功能是“清除/平坦化”,它可以重置您的高度圖,這樣您就可以重新開始。完成繪製高度圖後,單擊“3D 預覽”按鈕。它應該看起來像這樣(取決於您所繪製的內容)

要儲存您的高度圖,請單擊地形選單中的“匯出”,然後選擇“原始 8 位”作為匯出方法(1)。單擊“選擇檔案並儲存……”,命名您的高度圖並將其儲存到您的硬碟驅動器。

我們幾乎完成了高度圖,它現在以 .raw 格式。最後,我們需要使用 Photoshop 之類的程式或“XnView”(www.xnview.de) 等免費工具將這種格式轉換為其他格式。將您的 .raw 格式更改為 .jpg、.bmp 或 .png,因為 XNA 的“預設內容管道”可以將這些格式處理為“Texture2D”。
沒有紋理,我們的地形會是什麼樣的?因此,讓我們使用 Terragen 來建立一個紋理。為此,請在您的 Terragen 選單中開啟“渲染控制”。
首先要做的是使用“影像大小”(1)調整大小,具體取決於您建立高度圖的大小(512x512 或 256x256)。在渲染控制視窗的右下角,定位您的相機,以便您實際看到地板(2)。要直接面對地板,請將俯仰(3)的值設定為 -90。這會讓您直接看著地板。此外,將“細節”滑塊(4)設定為最大值,以便在渲染時獲得最高質量。單擊“渲染預覽”(5)以預覽您的紋理。或者,您可以再次開啟“3D 預覽”,但您的紋理不會顯示渲染。

紋理上的任何黑點可能是投射到地形上的陰影。單擊 Terragen 選單中的“照明條件”按鈕,然後取消選中“地形投射陰影”和“雲投射陰影”(1)以使它們消失。

現在您已經完成了,可以單擊“渲染影像”(6)在您的“渲染控制”中。Terragen 現在將渲染您的紋理,它應該看起來像這樣

您也可以更改紋理的顏色。為此,請單擊 Terragen 選單中的“地形”按鈕。選擇“表面地圖”(1),然後單擊“編輯”(2)。“表面層”視窗將開啟。現在單擊“顏色...”(3)選擇您的顏色。當您對紋理滿意後,將其儲存到您的硬碟驅動器。

嘗試不同的設定,渲染它並檢查更改。如果您選擇白色作為顏色,您的紋理應該看起來像這樣

現在我們完成了基礎部分,最終實現了我們的第一個目標 - 我們自己的高度圖和紋理
-
 我們的高度圖。
 -
 我們的紋理。


從現在開始,我們將開始將高度圖和紋理實現到 XNA 程式碼中。但要實際看到一些東西,我們需要從程式設計一個相機開始。
我們在 Visual Studio 2008 中建立一個新專案,並新增一個名為“Camera”的新類。
我們首先分配一些類變數。一個用於相機檢視的矩陣 viewMatrix 和一個用於投影的 projectionMatrix。projectionMatrix 將 3D 相機檢視轉換為 2D 影像。為了以後定位地形,我們將需要另一個矩陣 terrainMatrix。此外,如果我們可以在地形上移動或旋轉相機,那就太好了。因此,我們為相機的位置、對齊、移動和旋轉宣告 Vector3 變數。
        // matrix for camera view and projection
        Matrix viewMatrix;
        Matrix projectionMatrix;

        // world matrix for our landscape
        public Matrix terrainMatrix;

        // actual camera position, direction, movement, rotation
        Vector3 position;
        Vector3 direction;
        Vector3 movement;
        Vector3 rotation;
相機建構函式獲取引數來初始化所有這些變數。
        public Camera(Vector3 position, Vector3 direction, Vector3 movement, Vector3 landscapePosition)
        {
            this.position = position;
            this.direction = direction;
            this.movement = movement;
            rotation = movement*0.02f;
            //camera position, view of camera, see what is over camera
            viewMatrix = Matrix.CreateLookAt(position, direction, Vector3.Up);
            //width and height of camera near plane, range of camera far plane (1-1000)
            projectionMatrix = Matrix.CreatePerspective(1.2f, 0.9f, 1.0f, 1000.0f);
            // positioning our landscape in camera start position
            terrainMatrix = Matrix.CreateTranslation(landscapePosition);
        }
現在,如果您想知道 CreateLookAt()、CreatePerspective()、CreateTranslation() 究竟做了什麼,請檢視 XNA 框架的類庫 -> XNA 框架類庫參考。所有方法都在其中清楚地描述。請記住 XNA 框架類庫,以檢查您不清楚的所有方法,因為原始碼中使用的並非所有方法都將詳細解釋。
為了至少練習一次,我們使用 CreateTranslation() 方法。轉到 Matrix.CreatePerspective 方法 (Single, Single, Single, Single),您將找到對方法使用的所有引數以及它們的返回值的詳細描述。

回到我們的相機類。下一步是建立一個 Update() 方法,它將獲取一個數字作為引數。在此方法中,我們定義了相機的移動和旋轉,並在最後計算了新的相機位置。我們這樣做是因為,當我們稍後在 Game1.cs 中建立一個相機時,我們可以使用鍵盤輸入來移動相機。每個鍵盤輸入都會發送一個數字,該數字將由相機的 Update() 方法處理。
        public void Update(int number)
        {
            Vector3 tempMovement = Vector3.Zero;
            Vector3 tempRotation = Vector3.Zero;
            //left
            if (number == 1)
            {
                tempMovement.X = +movement.X;
            }
            //right
            if (number == 2)
            {
                tempMovement.X = -movement.X;
            }
            //up
            if (number == 3)
            {
                tempMovement.Y = -movement.Y;
            }
            //down
            if (number == 4)
            {
                tempMovement.Y = +movement.Y;
            }
            //backward (zoomOut)
            if (number == 5)
            {
                tempMovement.Z = -movement.Z;
            }
            //forward (zoomIn)
            if (number == 6)
            {
                tempMovement.Z = +movement.Z;
            }
            //left rotation
            if (number == 7)
            {
                tempRotation.Y = -rotation.Y;
            }
            //right rotation
            if (number == 8)
            {
                tempRotation.Y = +rotation.Y;
            }
            //forward rotation
            if (number == 9)
            {
                tempRotation.X = -rotation.X;
            }
            //backward rotation
            if (number == 10)
            {
                tempRotation.X = +rotation.X;
            }

            //move camera to new position
            viewMatrix = viewMatrix * Matrix.CreateRotationX(tempRotation.X) * Matrix.CreateRotationY(tempRotation.Y) * Matrix.CreateTranslation(tempMovement);
            //update position
            position += tempMovement;
            direction += tempRotation;
        }
最後,我們的相機獲得一個 Draw() 方法。在此方法中,我們傳遞地形,以確保它稍後顯示。
        public void Draw(Terrain terrain)
        {
            terrain.basicEffect.Begin();
            SetEffects(terrain.basicEffect);
            foreach (EffectPass pass in terrain.basicEffect.CurrentTechnique.Passes)
            {
                pass.Begin();
                terrain.Draw();
                pass.End();
            }
            terrain.basicEffect.End();
        }
在我們開始編寫 Terrain.cs 類之前,我們需要實現 Draw() 方法使用的 SetEffects() 方法。BasicEffect 是 XNA 框架中的一個類,它提供渲染效果來顯示物件。
        public void SetEffects(BasicEffect basicEffect)
        {
            basicEffect.View = viewMatrix;
            basicEffect.Projection = projectionMatrix;
            basicEffect.World = terrainMatrix;
        }
現在,我們的 Camera.cs 類已經準備好了,為了實際看到一些東西,我們現在開始編寫 Terrain.cs 類。
完整的 Camera.cs 類應該如下所示。
using System;
using System.Collections.Generic;
using System.Linq;
using System.Text;
using Microsoft.Xna.Framework;
using Microsoft.Xna.Framework.Audio;
using Microsoft.Xna.Framework.Content;
using Microsoft.Xna.Framework.GamerServices;
using Microsoft.Xna.Framework.Graphics;
using Microsoft.Xna.Framework.Input;
using Microsoft.Xna.Framework.Media;
using Microsoft.Xna.Framework.Net;
using Microsoft.Xna.Framework.Storage;

namespace WindowsGame1
{
    class Camera
    {
        // matrix for camera view and projection
        Matrix viewMatrix;
        Matrix projectionMatrix;

        // world matrix for our landscape
        public Matrix terrainMatrix;

        // actual camera position, direction, movement, rotation
        Vector3 position;
        Vector3 direction;
        Vector3 movement;
        Vector3 rotation;

        public Camera(Vector3 position, Vector3 direction, Vector3 movement, Vector3 landscapePosition)
        {
            this.position = position;
            this.direction = direction;
            this.movement = movement;
            rotation = movement*0.02f;
            //camera position, view of camera, see what is over camera
            viewMatrix = Matrix.CreateLookAt(position, direction, Vector3.Up);
            //width and height of camera near plane, range of camera far plane (1-1000)
            projectionMatrix = Matrix.CreatePerspective(1.2f, 0.9f, 1.0f, 1000.0f);
            // positioning our landscape in camera start position
            terrainMatrix = Matrix.CreateTranslation(landscapePosition);
        }

        public void Update(int number)
        {
            Vector3 tempMovement = Vector3.Zero;
            Vector3 tempRotation = Vector3.Zero;
            //left
            if (number == 1)
            {
                tempMovement.X = +movement.X;
            }
            //right
            if (number == 2)
            {
                tempMovement.X = -movement.X;
            }
            //up
            if (number == 3)
            {
                tempMovement.Y = -movement.Y;
            }
            //down
            if (number == 4)
            {
                tempMovement.Y = +movement.Y;
            }
            //backward (zoomOut)
            if (number == 5)
            {
                tempMovement.Z = -movement.Z;
            }
            //forward (zoomIn)
            if (number == 6)
            {
                tempMovement.Z = +movement.Z;
            }
            //left rotation
            if (number == 7)
            {
                tempRotation.Y = -rotation.Y;
            }
            //right rotation
            if (number == 8)
            {
                tempRotation.Y = +rotation.Y;
            }
            //forward rotation
            if (number == 9)
            {
                tempRotation.X = -rotation.X;
            }
            //backward rotation
            if (number == 10)
            {
                tempRotation.X = +rotation.X;
            }

            //move camera to new position
            viewMatrix = viewMatrix * Matrix.CreateRotationX(tempRotation.X) * Matrix.CreateRotationY(tempRotation.Y) * Matrix.CreateTranslation(tempMovement);
            //update position
            position += tempMovement;
            direction += tempRotation;
        }

        public void SetEffects(BasicEffect basicEffect)
        {
            basicEffect.View = viewMatrix;
            basicEffect.Projection = projectionMatrix;
            basicEffect.World = terrainMatrix;
        }

        public void Draw(Terrain terrain)
        {
            terrain.basicEffect.Begin();
            SetEffects(terrain.basicEffect);
            foreach (EffectPass pass in terrain.basicEffect.CurrentTechnique.Passes)
            {
                pass.Begin();
                terrain.Draw();
                pass.End();
            }
            terrain.basicEffect.End();
        }
    }
}
建立一個新類並將其重新命名為 Terrain.cs。我們首先定義所需的類變數。我們需要 Texture2D 變數來儲存我們的高度圖和紋理影像,以及用於處理紋理的變數,特別是陣列。
        GraphicsDevice graphicsDevice;

        // heightMap
        Texture2D heightMap;
        Texture2D heightMapTexture;
        VertexPositionTexture[] vertices;
        int width;
        int height;

        public BasicEffect basicEffect;
        int[] indices;

        // array to read heightMap data
        float[,] heightMapData;
在我們的 Terrain.cs 的建構函式中,我們呼叫 GraphicsDevice 單位以便能夠在我們的類中訪問它。
        public Terrain(GraphicsDevice graphicsDevice)
        {
            this.graphicsDevice = graphicsDevice;
        }
現在我們建立一個方法,該方法將獲取我們的紋理(這將來自 Game1.cs 類,稍後解釋)並呼叫其他方法,以便我們更接近我們的地形。所以讓我們編寫缺少的方法。
        public void SetHeightMapData(Texture2D heightMap, Texture2D heightMapTexture)
        {
            this.heightMap = heightMap;
            this.heightMapTexture = heightMapTexture;
            width = heightMap.Width;
            height = heightMap.Height;
            SetHeights();
            SetVertices();
            SetIndices();
            SetEffects();
        }
我們首先實現 SetHeight() 方法,該方法將從紋理的每個畫素獲取灰度值,表示其實際高度,並將它們寫入 heightMapData[] 陣列中。完整方法
public void SetHeights()
        {
            Color[] greyValues = new Color[width * height];
            heightMap.GetData(greyValues);
            heightMapData = new float[width, height];
            for (int x = 0; x < width; x++)
            {
                for (int y = 0; y < height; y++)
                {
                    heightMapData[x, y] = greyValues[x + y * width].G / 3.1f;
                }
            }
        }
要獲取每個灰度的強度,只需獲取單個顏色的值,可以是紅色、綠色或藍色 - 您選擇哪一個都可以。為了避免高度相差太大,您可以將顏色值除以一個值。因此,這行程式碼
heightMapData[x, y] = greyValues[x + y * width].G / 3.1f;
它也可以反過來。當您乘以一個值時,您將獲得更高的海拔差異。
接下來的兩個方法處理索引和頂點的建立。SetVertice() 使用三角形建立我們的地形區域。一個區域由兩個三角形組成。三角形可以透過 3 個數字來描述,這些數字稱為索引。這些三角形的索引被分配給頂點。如果您需要對此進行復習,請檢視 Riemer 的 XNA 教程 -> 使用索引回收頂點.
在我們的方法中,使用了一些奇怪的數學運算來計算正確的索引。稍微試著調整一下,看看改變某些值會發生什麼。
        public void SetIndices()
        {
            // amount of triangles
            index = new int[6 * (width - 1) * (height - 1)];
            int number = 0;
            // collect data for corners
            for (int y = 0; y < height - 1; y++)
                for (int x = 0; x < width - 1; x++)
                {
                    // create double triangles
                    index[number] = x + (y + 1) * width;      // up left
                    index[number + 1] = x + y * width + 1;        // down right
                    index[number + 2] = x + y * width;            // down left
                    index[number + 3] = x + (y + 1) * width;      // up left
                    index[number + 4] = x + (y + 1) * width + 1;  // up right
                    index[number + 5] = x + y * width + 1;        // down right
                    number += 6;
                }
        }
SetVertices() 方法計算紋理應應用於每個頂點的 2D 位置。高度和深度將使用來自 heightMapData[] 陣列的資料進行分配。
public void SetVertices()
        {
            vertices = new VertexPositionTexture[width * height];
            Vector2 texturePosition;
            for (int x = 0; x < width; x++)
            {
                for (int y = 0; y < height; y++)
                {
                    texturePosition = new Vector2((float)x / 25.5f, (float)y / 25.5f);
                    vertices[x + y * width] = new VertexPositionTexture(new Vector3(x, heightMapData[x, y], -y), texturePosition);
                }
                graphicsDevice.VertexDeclaration = new VertexDeclaration(graphicsDevice, VertexPositionTexture.VertexElements);
            }
        }
現在我們在其中使用一個新的 BasicEffet 型別(維基百科:著色器)的著色器物件來實現 SetEffects() 方法。它的紋理屬性被分配到我們的地形紋理,並且它的顯示被啟用。
        public void SetEffects()
        {
            basicEffect = new BasicEffect(graphicsDevice, null);
            basicEffect.Texture = heightMapTexture;
            basicEffect.TextureEnabled = true;
        }
為了實際繪製地形,我們的 terrain.cs 類獲得了一個自己的 Draw() 方法。從這裡,我們呼叫 DrawUserIndexedPrimitives() 方法(來自 XNA 的 GraphicsDevice 類),該方法非常強大,包含一個很長的引數列表。首先是將要繪製的物件型別。使用 TriangleList 時,表示三角形集合。後面是我們的包含頂點的陣列。接下來的引數接受我們的頂點的起點和數量。接下來是包含我們索引的陣列,最後是第一個三角形的數量和三角形的數量。
        public void Draw()
        {
           graphicsDevice.DrawUserIndexedPrimitives<VertexPositionTexture>(PrimitiveType.TriangleList, vertices, 0, vertices.Length, indices, 0, indices.Length / 3);
        }
最後但並非最不重要的是,我們需要調整我們的 Game1.cs,在其中我們現在呼叫我們的相機和地形來實現我們的目標,即檢視我們的地形。
在此之前,完整 Terrain.cs 類的概述
using System;
using System.Collections.Generic;
using System.Linq;
using System.Text;
using Microsoft.Xna.Framework;
using Microsoft.Xna.Framework.Audio;
using Microsoft.Xna.Framework.Content;
using Microsoft.Xna.Framework.GamerServices;
using Microsoft.Xna.Framework.Graphics;
using Microsoft.Xna.Framework.Input;
using Microsoft.Xna.Framework.Media;
using Microsoft.Xna.Framework.Net;
using Microsoft.Xna.Framework.Storage;


namespace WindowsGame1
{
    public class Terrain
    {
        GraphicsDevice graphicsDevice;

        // heightMap
        Texture2D heightMap;
        Texture2D heightMapTexture;
        VertexPositionTexture[] vertices;
        int width;
        int height;

        public BasicEffect basicEffect;
        int[] indices;

        // array to read heightMap data
        float[,] heightMapData;


        public Terrain(GraphicsDevice graphicsDevice)
        {
            this.graphicsDevice = graphicsDevice;
        }

        public void SetHeightMapData(Texture2D heightMap, Texture2D heightMapTexture)
        {
            this.heightMap = heightMap;
            this.heightMapTexture = heightMapTexture;
            width = heightMap.Width;
            height = heightMap.Height;
            SetHeights();
            SetVertices();
            SetIndices();
            SetEffects();
        }

        public void SetHeights()
        {
            Color[] greyValues = new Color[width * height];
            heightMap.GetData(greyValues);
            heightMapData = new float[width, height];
            for (int x = 0; x < width; x++)
            {
                for (int y = 0; y < height; y++)
                {
                    heightMapData[x, y] = greyValues[x + y * width].G / 3.1f;
                }
            }
        }

        public void SetIndices()
        {
            // amount of triangles
            indices = new int[6 * (width - 1) * (height - 1)];
            int number = 0;
            // collect data for corners
            for (int y = 0; y < height - 1; y++)
                for (int x = 0; x < width - 1; x++)
                {
                    // create double triangles
                    indices[number] = x + (y + 1) * width;      // up left
                    indices[number + 1] = x + y * width + 1;        // down right
                    indices[number + 2] = x + y * width;            // down left
                    indices[number + 3] = x + (y + 1) * width;      // up left
                    indices[number + 4] = x + (y + 1) * width + 1;  // up right
                    indices[number + 5] = x + y * width + 1;        // down right
                    number += 6;
                }
        }

        public void SetVertices()
        {
            vertices = new VertexPositionTexture[width * height];
            Vector2 texturePosition;
            for (int x = 0; x < width; x++)
            {
                for (int y = 0; y < height; y++)
                {
                    texturePosition = new Vector2((float)x / 25.5f, (float)y / 25.5f);
                    vertices[x + y * width] = new VertexPositionTexture(new Vector3(x, heightMapData[x, y], -y), texturePosition);
                }
                graphicsDevice.VertexDeclaration = new VertexDeclaration(graphicsDevice, VertexPositionTexture.VertexElements);
            }
        }


        public void SetEffects()
        {
            basicEffect = new BasicEffect(graphicsDevice, null);
            basicEffect.Texture = heightMapTexture;
            basicEffect.TextureEnabled = true;
        }

        public void Draw()
        {
           graphicsDevice.DrawUserIndexedPrimitives<VertexPositionTexture>(PrimitiveType.TriangleList, vertices, 0, vertices.Length, indices, 0, indices.Length / 3);
        }

    }
}
在我們開始之前,我們將我們的高度圖以及我們的紋理影像匯入 VisualStudio2008。右鍵單擊專案資源管理器中的內容。在彈出的選單中選擇“新增” -> “現有元素...”。選擇您的影像並匯入它們。現在您應該在“內容”下看到您的高度圖和紋理影像。現在建立您的相機和地形作為類變數。
        //-------------CAMERA------------------
        Camera camera;

        //-------------TERRAIN-----------------
        Terrain landscape;
為了讓 VisualStudio2008 知道在哪裡找到您的影像,在建構函式中新增以下行
Content.RootDirectory = "Content";
接下來使用 Initialize() 方法初始化您的相機和地形。
            // initialize camera start position
            camera = new Camera(new Vector3(-100, 0, 0), Vector3.Zero, new Vector3(2, 2, 2), new Vector3(0, -100, 256));

            // initialize terrain
            landscape = new Terrain(GraphicsDevice);
如果您後來什麼也看不到,您可能需要調整傳遞到相機類的 Vector3 向量。
LoadContent() 方法中的以下行用於將高度圖和紋理影像載入到您的地形類中
            //load heightMap and heightMapTexture to create landscape
           landscape.SetHeightMapData(Content.Load<Texture2D>("heightMap"), Content.Load<Texture2D>("heightMapTexture"));
因為我們將相機類程式設計為向前看,並且想要將相機移動到我們的地形上,所以我們只需要在 Update() 方法中定義移動鍵即可。
// move camera position with keyboard
            KeyboardState key = Keyboard.GetState();
            if (key.IsKeyDown(Keys.A))
            {
                camera.Update(1);
            }
            if (key.IsKeyDown(Keys.D))
            {
                camera.Update(2);
            }
            if (key.IsKeyDown(Keys.W))
            {
                camera.Update(3);
            }
            if (key.IsKeyDown(Keys.S))
            {
                camera.Update(4);
            }
            if (key.IsKeyDown(Keys.F))
            {
                camera.Update(5);
            }
            if (key.IsKeyDown(Keys.R))
            {
                camera.Update(6);
            }
            if (key.IsKeyDown(Keys.Q))
            {
                camera.Update(7);
            }
            if (key.IsKeyDown(Keys.E))
            {
                camera.Update(8);
            }
            if (key.IsKeyDown(Keys.G))
            {
                camera.Update(9);
            }
            if (key.IsKeyDown(Keys.T))
            {
                camera.Update(10);
            }
最後但並非最不重要的是,我們需要告訴相機的 Draw() 方法繪製我們的地形。
            // to get landscape viewable
            camera.Draw(landscape);
using System;
using System.Collections.Generic;
using System.Linq;
using Microsoft.Xna.Framework;
using Microsoft.Xna.Framework.Audio;
using Microsoft.Xna.Framework.Content;
using Microsoft.Xna.Framework.GamerServices;
using Microsoft.Xna.Framework.Graphics;
using Microsoft.Xna.Framework.Input;
using Microsoft.Xna.Framework.Media;
using Microsoft.Xna.Framework.Net;
using Microsoft.Xna.Framework.Storage;

namespace WindowsGame1
{
    /// <summary>
    /// This is the main type for your game
    /// </summary>
    public class Game1 : Microsoft.Xna.Framework.Game
    {
        GraphicsDeviceManager graphics;
        SpriteBatch spriteBatch;

        //-------------CAMERA------------------
        Camera camera;

        //-------------TERRAIN-----------------
        Terrain landscape;

        public Game1()
        {
            graphics = new GraphicsDeviceManager(this);
            Content.RootDirectory = "Content";
        }


        protected override void Initialize()
        {
            // initialize camera start position
            camera = new Camera(new Vector3(-100, 0, 0), Vector3.Zero, new Vector3(2, 2, 2), new Vector3(0, -100, 256));

            // initialize terrain
            landscape = new Terrain(GraphicsDevice);

            base.Initialize();
        }

        protected override void LoadContent()
        {
            // Create a new SpriteBatch, which can be used to draw textures.
            spriteBatch = new SpriteBatch(GraphicsDevice);

            //load heightMap and heightMapTexture to create landscape
           landscape.SetHeightMapData(Content.Load<Texture2D>("heightMap"), Content.Load<Texture2D>("heightMapTexture"));
        }

        protected override void Update(GameTime gameTime)
        {
            // move camera position with keyboard
            KeyboardState key = Keyboard.GetState();
            if (key.IsKeyDown(Keys.A))
            {
                camera.Update(1);
            }
            if (key.IsKeyDown(Keys.D))
            {
                camera.Update(2);
            }
            if (key.IsKeyDown(Keys.W))
            {
                camera.Update(3);
            }
            if (key.IsKeyDown(Keys.S))
            {
                camera.Update(4);
            }
            if (key.IsKeyDown(Keys.F))
            {
                camera.Update(5);
            }
            if (key.IsKeyDown(Keys.R))
            {
                camera.Update(6);
            }
            if (key.IsKeyDown(Keys.Q))
            {
                camera.Update(7);
            }
            if (key.IsKeyDown(Keys.E))
            {
                camera.Update(8);
            }
            if (key.IsKeyDown(Keys.G))
            {
                camera.Update(9);
            }
            if (key.IsKeyDown(Keys.T))
            {
                camera.Update(10);
            }
            base.Update(gameTime);
        }


        protected override void Draw(GameTime gameTime)
        {
            GraphicsDevice.Clear(Color.CornflowerBlue);
            // to get landscape viewable
            camera.Draw(landscape);

            base.Draw(gameTime);
        }
    }
}
恭喜- 我們完成了。
作為您的工作的結果,您現在應該看到您的地形,其高度圖和紋理由偵錯程式生成。此外,您可以將相機移動到您的地形上,以確認您確實擁有高度和深度。
-
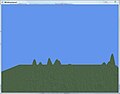 帶紋理的地形。
 -
 帶不同紋理的地形。


如果您想知道您的地形作為三角形網格的樣子,請轉到 Terrain.cs 類的 SetEffects() 方法,並像這樣修改它
        public void SetEffects()
        {
            basicEffect = new BasicEffect(graphicsDevice, null);
            basicEffect.Texture = heightMapTexture;
            basicEffect.TextureEnabled = false;
            graphicsDevice.RenderState.FillMode = FillMode.WireFrame;
        }
-
 地形作為網格。
 -
 更近距離地縮放地形。


現在您可以透過簡單地使用不同的高度圖輕鬆替換整個地形。紋理也是如此。只需在 Terrain.cs 類中的 SetHeightMapData() 方法中使用新影像的新名稱作為引數。
landscape.SetHeightMapData(Content.Load<Texture2D>("heightMap"), Content.Load<Texture2D>("heightMapTexture"));
不幸的是,XNA 的基本著色器 (BasicEffect) 只能處理一種紋理。為了改進您的地形,您現在可以編寫自己的 EffectShader 檔案,該檔案可以處理多種紋理。如果您對著色器感興趣,請檢視 使用 XNA 建立遊戲/3D 開發/著色器和效果。您可以使用多紋理使您的地形更有趣。
也可以使用 3D 建模軟體建立地形,並將其作為 .x 或 .fbx 檔案匯入。這樣做將需要更多的 CPU 能力和 3D 建模軟體的知識。檢視 使用 XNA 建立遊戲/3D 開發/匯入模型.
另一個非常複雜的主題是檢測在您地形表面移動的物件的碰撞。檢視 使用 XNA 建立遊戲/數學物理/碰撞檢測。使用下圖進行簡要介紹。

藍色圓圈是物件(可能是您的遊戲角色)。該物件必須始終請求您地形在其移動方向上的 y 位置(綠色線)。為了在您的地形海拔髮生變化時獲得平滑的移動,您需要對您物件向量的當前位置的 y 值與您地形向量的新的 y 值(目的地)進行插值(維基百科:插值)。影像中地形的 y 值從 15 變化到 23。
您可以在此處找到有關此主題和一些程式碼的更多資訊
- http://en.wikipedia.org/
- http://www.riemers.net/eng/Tutorials/XNA/Csharp/Series1/Terrain_from_file.php
- Microsoft XNA Game Studio 3.0,Chad Carter
- Microsoft XNA Game Studio 建立者指南第二版,S. Cawood 和 P. McGee
- 使用 XNA 框架進行遊戲程式設計,Hans-Georg Schumann
RayIncarnation